

Dyness Inverters
Important
Important
Currently, the integration for C&I cabinets with MPPT, the max SOC is limited to 95% in order to allow PV to continue to feed the load.
Supported Devices
| Device Type | Variants | Modbus TCP (Ethernet) | RS485 | Curtailment |
|---|---|---|---|---|
| DH100F | 71~100kWh | ✅ | ✅ | ✅ |
| DH200F | 100kW/215kWh | |||
| DH200Y | 100kW/232kWh | |||
| LS | ||||
| HT-A | ||||
| DH800Y | ⚠️ this feature has yet to be tested |
Wiring
The a-TroniX Controller and the Dyness inverters communicate via RS485 or Ethernet.
Ethernet
For correct ethernet wiring: Follow the the guidelines for ethernet wiring.
RS485
Info
RS485 Wiring
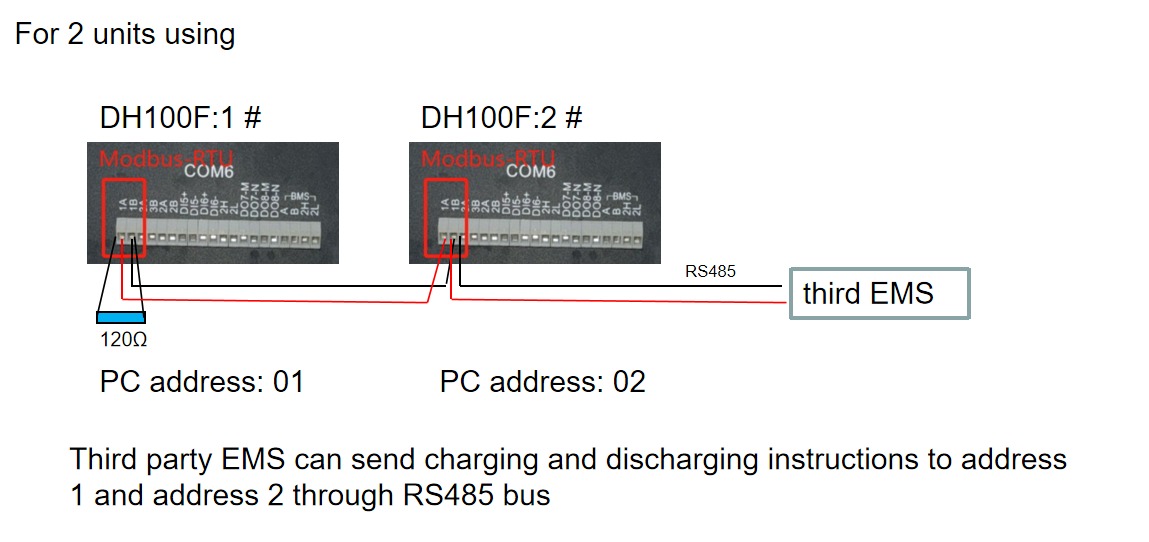
- For correct RS485 wiring: Follow the guidelines for RS485 wiring.
- If the wiring shown in the table below is incorrect, please let us know.
- There is no general consensus in the industry about the usage of A and B for the RS485 polarity, so it may be counterintuitive and opposite of what you might expect for some devices.
| Device | a-TroniX Controller model OM1 | a-TroniX Controller model IG8 | RS485-USB converter | RS485-Ethernet converter |
|---|---|---|---|---|
| COM6 terminal 1A | RS485 A | RS485_POS | RS485 A | TX+ |
| Com6 terminal 1B | RS485 B | RS485_NEG | RS485 B | TX- |
| N/A | RS GND | GND | Not available | G |
Configuration
DH100F
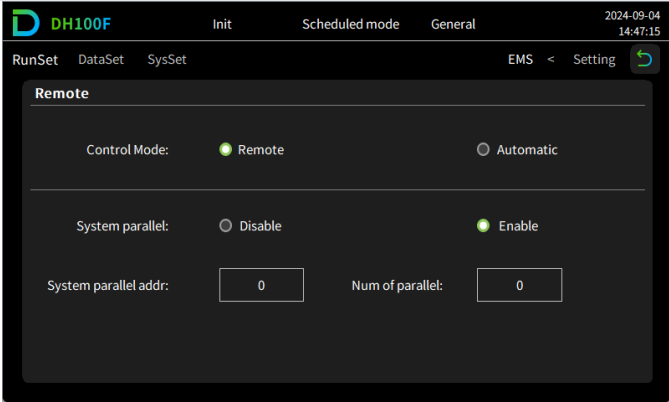
The Dyness DH100F needs to be set to remote mode:
- Click the main menu icon on the upper right corner of the main interface
- Click "Data" in the main menu bar
- Click "EMS" in the sub-menu bar
- Click "RunSet" at the upper left of the navigation bar
- Set the Control Mode to "Remote"
Warning
NOTE: RS485 Device Addresses
- You MUST give each device on the RS485 bus a unique address. Check the manual of the device on how to do this.
- Use lower addresses first (1, 2, ...) because the a-TroniX Controller will find them faster!
- For each device, it is generally recommended to stick with the factory default baud rate, parity, and stop bits. The a-TroniX Controller will scan on those first.
Last updated August 24, 2026Edit this page