
عدادات الطاقة إينيبرو
الأجهزة المدعومة
| Device Type | Modbus TCP (Ethernet) | RS485 |
|---|---|---|
| Inepro PRO380 | ❌ | ✅ |
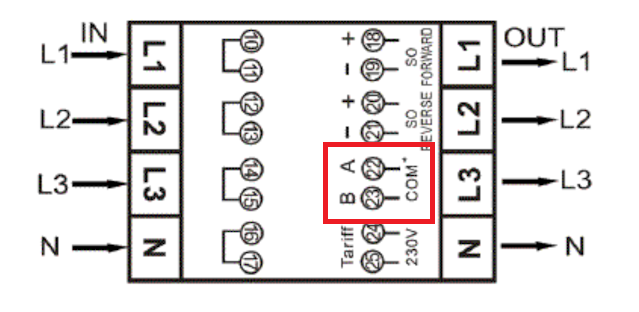
التوصيل
RS485
معلومات
RS485 Wiring
- For correct RS485 wiring: Follow the guidelines for RS485 wiring.
- If the wiring shown in the table below is incorrect, please let us know.
- There is no general consensus in the industry about the usage of A and B for the RS485 polarity, so it may be counterintuitive and opposite of what you might expect for some devices.
| Device | a-TroniX Controller model OM1 | a-TroniX Controller model IG8 | RS485-USB converter | RS485-Ethernet converter |
|---|---|---|---|---|
| A (pin 22) | RS485 A | RS485_POS | RS485 A | TX+ |
| B (pin 23) | RS485 B | RS485_NEG | RS485 B | TX- |
| N/A | RS GND | GND | Not available | G |
الإعداد
تحذير
NOTE: RS485 Device Addresses
- You MUST give each device on the RS485 bus a unique address. Check the manual of the device on how to do this.
- Use lower addresses first (1, 2, ...) because the a-TroniX Controller will find them faster!
- For each device, it is generally recommended to stick with the factory default baud rate, parity, and stop bits. The a-TroniX Controller will scan on those first.
يرجى الرجوع إلى دليل العداد لمزيد من المعلومات التفصيلية حول تغيير عنوان Modbus. بشكل افتراضي، يتم تعيين العداد إلى العنوان 1. يمكن تغييره عبر شاشة العداد.
- استخدم الأزرار للذهاب إلى وضع البرنامج 2.
- اضغط مع الاستمرار على الزر الأيمن لمدة 3 ثوانٍ لفتح القائمة.
- انتقل إلى صفحة LCD بعنوان Modbus/M-bus ID (addr xxx).
- اضغط مع الاستمرار على الزر الأيمن لمدة 5 ثوانٍ للدخول إلى وضع البرمجة.
- يبدأ الرقم في الوميض: اختر 3 أرقام (Modbus: 001-247). أكد كل رقم بالضغط مع الاستمرار على كلا الزرين لمدة 3 ثوانٍ.
- تظهر على شاشة LCD كلمة OK عندما يتم تأكيد الإعداد.
